There are two ways to connect a Meta Quest 3 to your PC:
- Through Air Link or Virtual Desktop (wireless)
- Through Quest Link (using a cable)
Connecting Quest 3 to PC Wirelessly (Air Link)
In order to connect your Quest 3 to PC via Air Link, follow these steps:
- Download the Oculus App to your PC.
- Open the Oculus App
- Put on your Quest 3 headset and go to “Quick Settings”
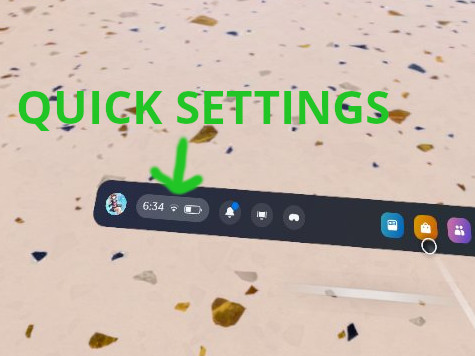
- Select “Quest Link” from the Quick Settings Menu

- Enable Air Link, then select your computer from the list of available PCs.

- Follow the rest of the prompts. It will ask you to confirm a pairing code. Ensure that it’s correct and press confirm.

If your computer doesn’t appear on the list of available PCs, make the headset is connected to the same network as your PC and that the Oculus app is installed and running on your PC.
Requirements for Air Link:
- Ensure you have a 5 Ghz router
- Router should be in the same room as the headset, or within line of sight
- A VR-Ready PC (see: Best computers for the Quest 3)
How to Connect a Quest 3 to Your PC With Cable

Requirements for Quest Link:
- A high quality Quest Link cable (USB-C 3.0 cable)
- A VR-Ready PC (see: Best computers for the Quest 3)
How to connect Quest 3 to PC:
- Download the Oculus App to your PC.
- Open the Oculus App
- Turn on your Quest 3 headset
- Plug in your USB-C cable into your PC first, then plug the other end into your VR headset
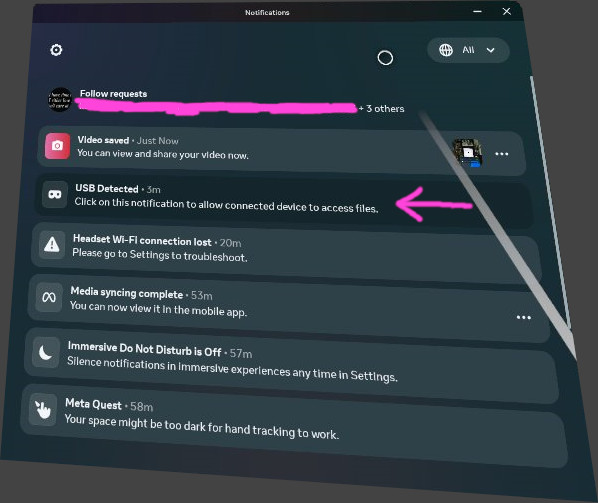
- It should ask you to allow USB Debugging. Press allow. If you don’t have this option, go to notifications and click on “USB Detected”:
- Now it prompt whether you want to start Quest Link. Press allow and launch Quest Link.
- If you didn’t receive the prompt, you can manually go to “Settings -> System -> Quest Link”

After following these steps, you should be able to play SteamVR games on your Quest 3.
If you’re still having trouble, here are some troubleshooting steps: Computer can’t detect Quest 3?
Looking for PC VR games to play? Check out our curated list of Best VR Games on Steam